How to Save Tomato Seeds for Planting


How to Save Tomato Seeds: A Step-by-Step Guide
Saving tomato seeds is a rewarding process that ensures you can enjoy your favorite tomato varieties year after year. Here’s a comprehensive guide on how to collect, ferment, clean, dry, and store tomato seeds effectively.
1. Collect Ripe Tomatoes
Begin by selecting fully ripe tomatoes from your garden. The best time to collect seeds is from mid-summer to fall when the tomatoes are at their peak maturity. Ripe tomatoes will provide seeds that are more likely to germinate successfully.
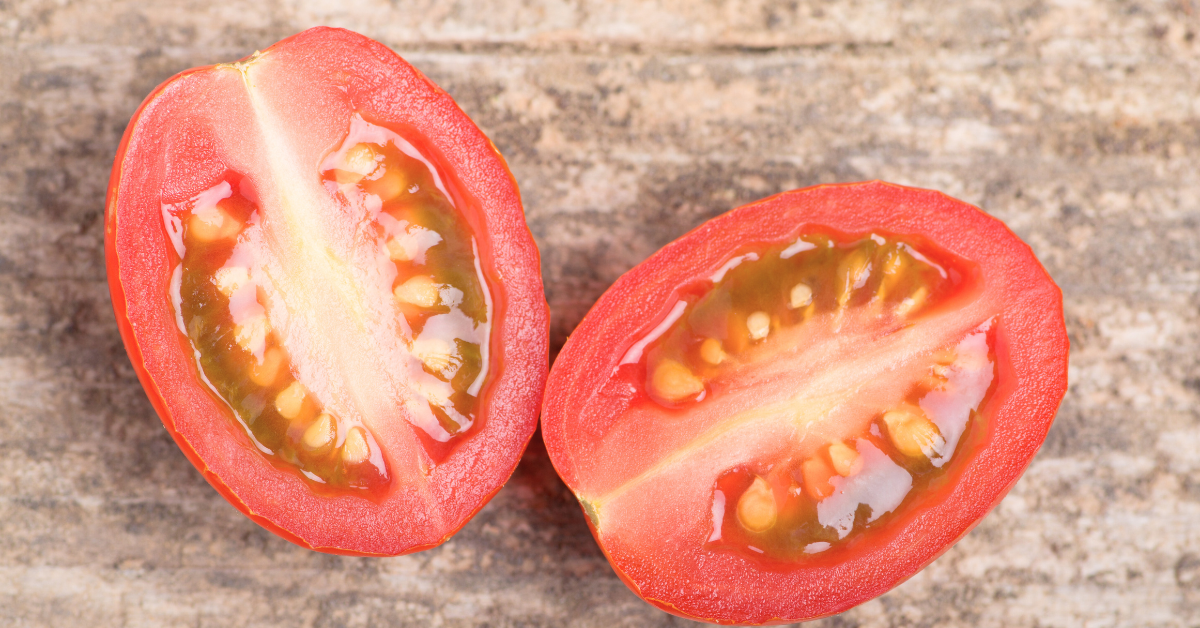
2. Remove Seeds
Next, cut the tomatoes and scrape the seeds away from the pith. Use a spoon or your fingers to gently extract the seeds, ensuring you remove as much of the surrounding pulp as possible.
3. Ferment the Seeds
Place the seeds in a jar or cup and cover them with water. Then, cover the jar with a paper towel secured with a rubber band. Let the seeds sit for about three days, during which time fermentation will occur. Swirl the jar a few times a day to mix the contents. The fermentation process is crucial as it kills any bacteria on the seeds and dissolves the slimy coating that protects them. This step helps ensure the seeds stay dry and mold-free during storage. After a few days, you’ll notice white mold growing on top of the water, and most of the seeds will have sunk to the bottom.
4. Clean the Seeds
Once the fermentation is complete, strain the seeds using a colander. Rinse them thoroughly under running water to remove any remaining pulp or mold. Proper cleaning is essential to ensure the seeds are ready for drying.
5. Dry the Seeds
Spread the clean seeds out on paper plates to dry completely. This process can take a week or more, depending on the humidity and temperature of your environment. Make sure the seeds are spread out in a single layer to allow for even drying.
6. Store the Seeds
After the seeds are fully dried, store them in an airtight container. Keep the container in a cool, dry place such as a room, refrigerator, or freezer. For extra protection against moisture, you can add small packets of silica gel to the container. If you choose to store the seeds in the fridge or freezer, let them reach room temperature before opening the container to avoid introducing moisture from condensation.
Longevity of Stored Seeds
When stored properly, tomato seeds can remain viable for up to 10 years. By following these steps, you can ensure your seeds stay healthy and ready for planting whenever you’re ready to start your next garden.
Saving Tomato Seeds: The Fermenting Method
Saving tomato seeds through fermentation is a highly effective method that ensures your seeds are clean, viable, and ready for future planting. Here’s a detailed guide on how to ferment tomato seeds for the best results.
Why Fermentation?
Fermentation helps to remove the gelatinous coating around tomato seeds, which can inhibit germination if left intact. This process also kills off any bacteria or fungal spores, reducing the risk of disease in your future plants.
Step-by-Step Guide to Fermenting Tomato Seeds
Step 1: Collect Ripe Tomatoes
Select fully ripe tomatoes from your garden. The best time to collect these is from mid-summer to fall when the tomatoes have reached their peak ripeness. Ripe tomatoes provide the best quality seeds for harvesting.
Step 2: Remove the Seeds
Cut open the tomatoes and scoop out the seeds along with the surrounding gel and pulp. Place the seeds into a jar or cup. It’s important to remove as much of the tomato flesh as possible, leaving primarily seeds and the gelatinous coating.
Step 3: Ferment the Seeds
- Add Water: Pour a small amount of water into the jar with the seeds. The water should cover the seeds but not fill the jar completely.
- Cover the Jar: Place a paper towel over the jar and secure it with a rubber band. This allows air to circulate while keeping out pests and debris.
- Let Sit for 3 Days: Allow the jar to sit at room temperature for about three days. Swirl the jar a few times each day to mix the contents. During this period, the fermentation process will break down the gelatinous coating and kill off any harmful bacteria or fungi.
- Observe the Mold: After a few days, you’ll notice a layer of white mold forming on the surface of the water, and most of the seeds will have sunk to the bottom. This indicates that the fermentation process is working.
Step 4: Clean the Seeds
Once fermentation is complete, it’s time to clean the seeds:
- Strain the Seeds: Pour the contents of the jar into a fine-mesh strainer to separate the seeds from the liquid and mold.
- Rinse Thoroughly: Rinse the seeds under running water, using your fingers to remove any remaining bits of pulp and mold. Ensure the seeds are clean and free of debris.
Step 5: Dry the Seeds
- Spread Out to Dry: Spread the cleaned seeds on a paper towel, paper plate, or a mesh screen. Ensure the seeds are in a single layer to allow for even drying.
- Air Dry Completely: Place the seeds in a well-ventilated area and let them dry completely. This process can take a week or more, depending on the humidity and temperature.
Step 6: Store the Seeds
- Airtight Container: Once the seeds are fully dry, store them in an airtight container. This can be a glass jar, a plastic container, or a sealed plastic bag.
- Cool, Dry Place: Keep the container in a cool, dry place such as a cupboard, refrigerator, or freezer. For added protection, you can include small packets of silica gel to absorb any excess moisture.
- Avoid Condensation: If storing in the refrigerator or freezer, let the container reach room temperature before opening to prevent condensation from introducing moisture.
How to Save Tomato Seeds Without Fermenting
Fermentation is a common method for saving tomato seeds, but it’s not the only way. For those looking for a quicker, simpler approach, here’s a method that skips fermentation altogether.
Step-by-Step Guide to Saving Tomato Seeds Without Fermentation
Step 1: Select Ripe Tomatoes
Choose fully ripe tomatoes from your garden. The best time to collect these is between mid-summer and fall, when the tomatoes are at their peak. Fully ripe tomatoes provide mature seeds that are ready for harvesting.
Step 2: Extract the Seeds
Cut the tomatoes open and gently scoop out the seeds using a spoon or your fingers. Place the seeds in a bowl. Try to remove as much of the pulp as possible during this step.
Step 3: Clean the Seeds
Transfer the seeds to a fine-mesh strainer. Rinse them thoroughly under running water, using your fingers to rub off any remaining pulp. This step is crucial to ensure that the seeds are clean and free from any debris that could lead to mold growth during storage.
Step 4: Dry the Seeds
Spread the cleaned seeds on a paper towel or paper plate in a single layer. Allow them to air dry completely in a well-ventilated area. This process can take several days. Make sure the seeds are not piled on top of each other, as this can prevent proper drying and increase the risk of mold.
Step 5: Store the Seeds
Once the seeds are thoroughly dry, place them in an airtight container. Store the container in a cool, dry place such as a cupboard, refrigerator, or freezer. For added protection against moisture, consider including small packets of silica gel. If you choose to store the seeds in the refrigerator or freezer, allow the container to reach room temperature before opening it to avoid condensation.
Advantages of Skipping Fermentation
Skipping the fermentation process can save time and simplify the seed-saving procedure. Although fermentation has benefits such as killing bacteria and removing the seeds’ slimy coating, the non-fermentation method can still yield healthy, viable seeds if executed properly.
How to Save Cherry and Heirloom Tomato Seeds
Saving seeds from cherry tomatoes is a straightforward process, similar to saving seeds from larger tomato varieties. However, given their smaller size and slightly different handling needs, here’s a detailed guide tailored for cherry tomatoes.
Step 1: Select Ripe Cherry Tomatoes
Begin by selecting the ripest cherry tomatoes from your garden. Ripe tomatoes are typically at their best from mid-summer to fall. Choose tomatoes that are fully colored and slightly soft to the touch, as these will provide the most viable seeds.
Step 2: Remove the Seeds
Cut each cherry tomato in half and use a spoon or your fingers to scoop out the seeds and the surrounding gel. Due to their small size, it might be easier to squeeze the tomatoes gently over a bowl to release the seeds and gel. Make sure to collect as much of the gel and seeds as possible while avoiding any pulp.
Step 3: Ferment the Seeds
- Add Water: Place the seeds and gel into a small jar or cup. Add a small amount of water, just enough to cover the seeds.
- Cover the Jar: Cover the jar with a paper towel and secure it with a rubber band. This allows air to circulate while preventing debris from contaminating the seeds.
- Fermentation Process: Let the mixture sit for about three days at room temperature. Stir the mixture once or twice a day to mix the contents. During this time, natural fermentation will occur, breaking down the gel coating the seeds and killing off any pathogens.
- Mold Formation: After a few days, you’ll notice a layer of mold on the surface, and most of the seeds will sink to the bottom. This indicates that the fermentation process is complete.
Step 4: Clean the Seeds
- Strain the Seeds: Pour the contents of the jar through a fine-mesh strainer to separate the seeds from the liquid and mold.
- Rinse Thoroughly: Rinse the seeds under running water, using your fingers to remove any remaining pulp or mold. Ensure the seeds are thoroughly clean.
Step 5: Dry the Seeds
- Spread Out to Dry: Spread the clean seeds on a paper towel, paper plate, or mesh screen in a single layer. This allows for even drying.
- Dry Completely: Place the seeds in a well-ventilated area and let them dry completely. This drying process can take several days. Ensure the seeds are kept away from direct sunlight and moisture.
Step 6: Store the Seeds
- Airtight Container: Once the seeds are completely dry, store them in an airtight container. Options include glass jars, plastic containers, or sealed plastic bags.
- Cool, Dry Storage: Keep the container in a cool, dry place like a cupboard, refrigerator, or freezer. Adding small silica gel packets can help absorb any excess moisture.
- Avoid Condensation: If stored in the refrigerator or freezer, allow the container to reach room temperature before opening to prevent condensation, which can introduce moisture.
Drying Tomato Seeds on Paper Towels
Drying tomato seeds properly is a crucial step in the seed-saving process. Using paper towels is a convenient and effective method for drying seeds. Here’s a detailed guide on how to dry tomato seeds on paper towels, ensuring they remain viable and free from mold.
Why Dry on Paper Towels?
Paper towels are absorbent, readily available, and provide an even surface for seeds to dry. This method also makes it easy to label and store the seeds once they are dried.
Step-by-Step Guide to Drying Tomato Seeds on Paper Towels
Step 1: Collect and Clean the Seeds
Begin by selecting fully ripe tomatoes and extracting the seeds along with the surrounding gel. If you prefer, you can also ferment the seeds to remove the gel and kill off any pathogens. After fermentation, clean the seeds by rinsing them under running water to remove any remaining pulp or mold.
Step 2: Prepare the Paper Towels
- Lay Out Paper Towels: Lay a sheet of paper towel on a flat surface, such as a kitchen counter or table. If you are drying seeds from multiple tomato varieties, prepare separate sheets for each variety to avoid mixing them up.
- Label the Towels: Write the variety name and the date on the corner of each paper towel with a permanent marker. This helps keep your seeds organized and ensures you know which seeds are which.
Step 3: Spread the Seeds
- Distribute Evenly: Spread the cleaned seeds evenly across the paper towel. Ensure the seeds are spaced out and not clumped together. This helps promote even drying and reduces the risk of mold growth.
- Single Layer: Make sure the seeds are in a single layer to facilitate thorough drying. Overlapping seeds can retain moisture and lead to mold.
Step 4: Drying Process
- Air Dry: Place the paper towels with the seeds in a well-ventilated area away from direct sunlight. Good airflow is essential to speed up the drying process and prevent mold.
- Drying Time: Allow the seeds to air dry completely. This process can take anywhere from a few days to a week or more, depending on the humidity and temperature of your environment.
Step 5: Checking for Dryness
- Touch Test: To check if the seeds are dry, gently touch them. They should feel hard and not stick to your fingers.
- Bend Test: Try bending the paper towel. If the seeds stay in place and don’t stick to the towel, they are likely dry.
Step 6: Storing the Dried Seeds
- Separate from Paper Towels: Once the seeds are completely dry, you can either store them on the paper towel or transfer them to an airtight container. If you choose to leave them on the towel, cut the towel into smaller pieces, each containing a few seeds.
- Airtight Storage: Store the seeds in airtight containers such as glass jars, plastic containers, or sealed plastic bags. Label the containers with the variety name and the date.
- Cool, Dry Place: Keep the containers in a cool, dry place like a cupboard, refrigerator, or freezer. Including silica gel packets can help absorb any excess moisture and prolong the seeds’ viability.
Longevity of Properly Dried Seeds
Properly dried and stored tomato seeds can remain viable for several years. Ensuring they are completely dry before storage is key to preventing mold and maintaining their germination potential.

Leave a Reply